Nailhead Furniture: Use Trim Without Visual Noise
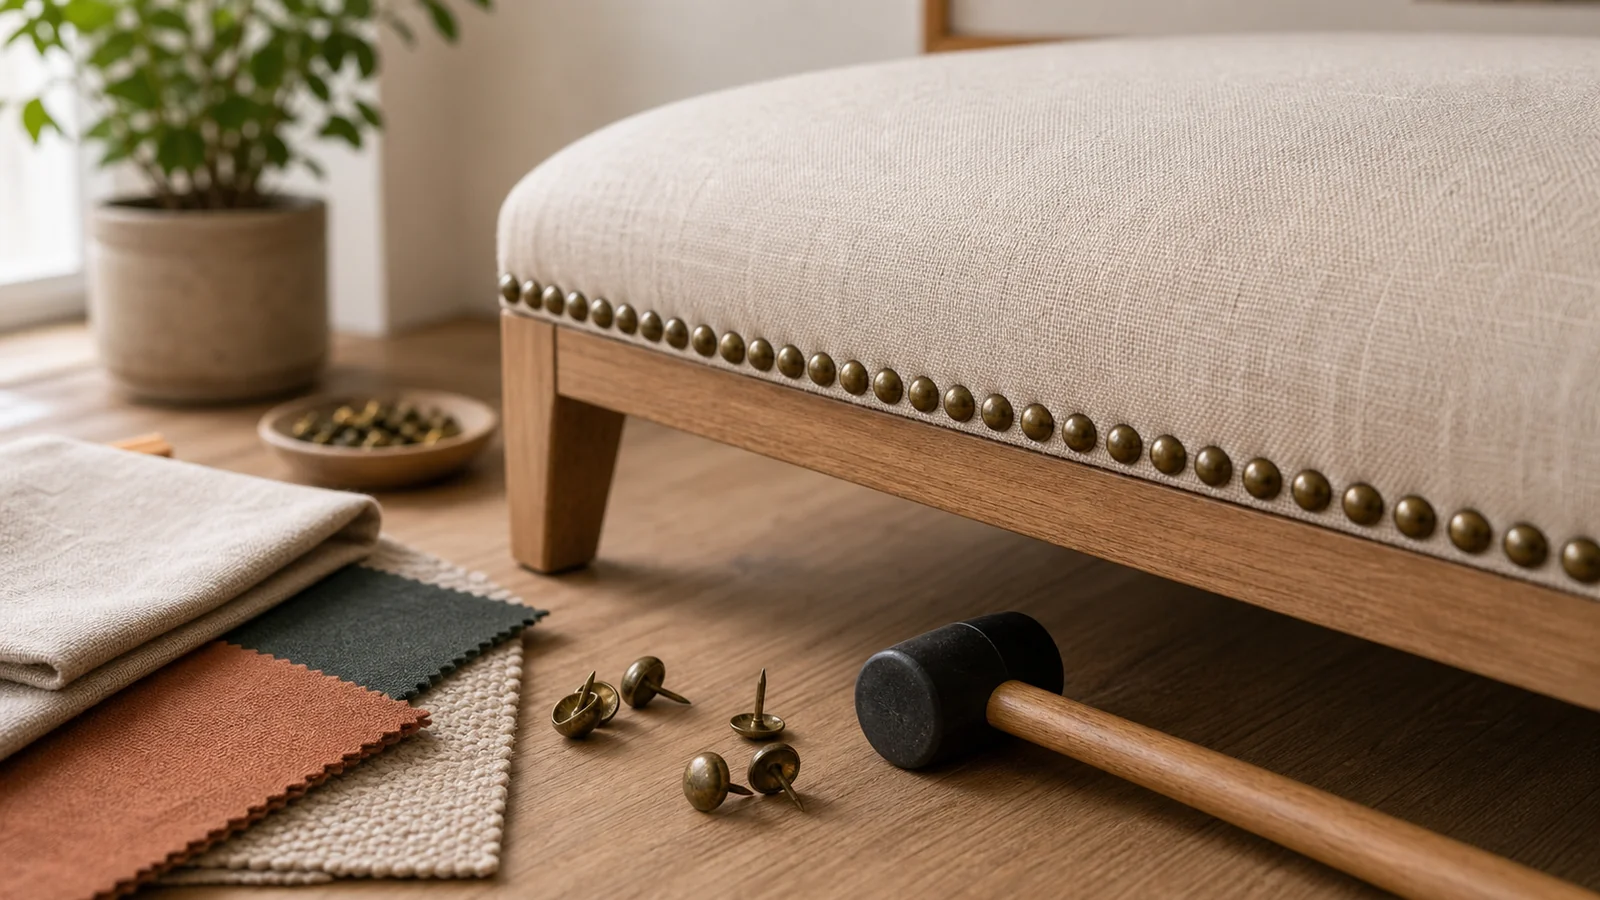
Nailhead trim works best when it has a quiet job
Nailhead furniture can look tailored, traditional, industrial, rustic, or overly busy. The difference is rarely the nailhead trim alone. It is the scale of the piece, the spacing of the nails, the metal finish, the fabric beneath it, and how much other detail the room already has.
In a small room, nailhead trim should define an edge rather than announce every edge. A single line on a chair arm, bench base, headboard, or ottoman can add structure to soft upholstery. Too many shiny studs on a large piece can make the room feel dotted, heavy, and visually restless.
This guide treats nailhead trim as a styling and quality decision, not just a decorative feature. The goal is to use the detail in a way that feels considered, tactile, and easy to live with.
Know what “nail furniture” usually means
When shoppers search for nail furniture, they are often looking for one of three things: furniture with nailhead trim, loose upholstery tacks for a repair or DIY update, or older furniture where metal nails are part of the construction. For home styling, the most common meaning is nailhead trim on upholstered furniture.
Nailheads are small metal studs or tacks set along a furniture edge. They may be individual nails hammered in one by one, or a connected trim strip where every few heads are functional and the rest are decorative. They are often used on:
- Dining chairs
- Accent chairs
- Headboards
- Storage ottomans
- Benches
- Sofas and loveseats
- Upholstered beds
- Leather or faux-leather pieces
The trim can be subtle or bold. Before you buy or update a piece, decide whether the nailheads are there to outline the shape, add contrast, hide an upholstery seam, or create a vintage reference. That job should guide every choice after it.
Start with one trimmed piece, not a matching set
Nailhead trim has rhythm. In a large room, repeated rhythm can feel formal. In a compact apartment, it can quickly become visual noise. A full set of nailhead dining chairs, a nailhead sofa, and a nailhead ottoman may look coordinated in a catalog but feel busy at home.
Start with one useful piece:
| Piece | Why it can work | Watch for |
|---|---|---|
| Dining chair | Small dose of detail | Too many chairs can create a dotted ring |
| Bench | Defines the lower edge | Trim can catch blankets or bags |
| Headboard | Adds structure behind soft bedding | Shiny metal may feel too loud at night |
| Ottoman | Soft piece with tailored edge | Studs may be uncomfortable near bare legs |
| Accent chair | Brings character to a corner | Large arms plus trim can feel heavy |
If the room already has patterned curtains, a textured rug, visible books, framed art, and brass lighting, choose a quieter nailhead piece. If the room is very plain, one trimmed chair or bench can add enough character without adding more furniture.
Match the nailhead size to the furniture scale
Small furniture does not always need tiny nailheads, but the proportion should feel deliberate. Oversized nailheads on a slim dining chair can look costume-like. Tiny studs on a deep rolled-arm chair may disappear or look fussy.
Use the piece’s thickness as a clue. A narrow chair rail, thin headboard edge, or light bench usually looks better with smaller, closer trim. A generous chair arm, leather ottoman, or substantial headboard can carry larger nailheads if the rest of the design is restrained.
Step back several feet before judging. Detail that looks charming up close can read as spots from across the room. This is especially true with bright silver, polished brass, or high-contrast trim against dark fabric.
Choose the metal finish with the room’s hardware
Nailhead trim does not have to match every metal in the room, but it should not fight them. Look at lamp bases, cabinet pulls, picture frames, curtain rods, table legs, and door hardware. Then decide whether the trim should blend in or add a small accent.
Common finish directions:
- Antique brass feels warmer and softer than bright gold.
- Pewter can work with blue-gray, charcoal, and cooler palettes.
- Bronze reads quieter on warm neutrals and leather.
- Blackened metal can feel graphic but may look heavy on pale fabric.
- Bright chrome or polished nickel needs a very clean room to stay calm.
If you are unsure, choose a muted metal. Highly shiny nailheads catch light from every angle. That can be lively in a hotel lobby and distracting in a small living room.
Pair nailheads with simple upholstery
Nailhead trim already adds texture, contrast, and rhythm. The fabric underneath should usually do less, especially in a compact room.
Good pairings include:
- Plain linen-look upholstery with antique brass trim.
- Soft leather with aged bronze trim.
- Velvet with a restrained, widely spaced line.
- A woven neutral fabric with matte pewter trim.
- A calm headboard fabric with small nailheads along one edge.
More difficult pairings include:
- Large print plus shiny trim.
- High-contrast piping plus nailheads plus tufting.
- Busy woven fabric with closely spaced metal studs.
- Bright white faux leather with mirror-bright trim.
- Multiple rows of nailheads on a small piece.
If you love pattern, keep the nailheads minimal. If you love nailheads, let the fabric stay quieter. Small rooms usually need one main texture statement at a time.
Check comfort and snag points before style
Nailheads are hard. That sounds obvious, but it matters. A row placed where your arm rests, where your thigh brushes a bench, or where bedding pulls across a headboard can become annoying.
Run your hand gently along the trim. The heads should feel even, secure, and smooth. There should not be sharp edges, raised points, loose nails, or gaps where fabric can catch. On secondhand furniture, check whether the nailheads are rusty, bent, missing, or pulling away from the frame.
For upholstered dining chairs, sit down and push back from the table. Make sure the trim does not scrape another chair, a table base, or a wall. For storage ottomans, open and close the lid. For headboards, check where pillows, hair, and bedding meet the trim.
If a piece is beautiful but uncomfortable, it will not become more practical after delivery.
Use DIY nailhead trim with restraint
Adding nailhead trim can refresh a plain chair, bench, or headboard, but it is not as casual as sticking on a decorative strip. The line has to be straight, the spacing has to be consistent, and the base material must be strong enough to hold the nails.
Before a DIY project, test on a hidden area or scrap material. Confirm that the tack length suits the frame and padding. Use proper upholstery tools, not random household nails. Mark the line first, then work slowly. A spacing guide or template helps keep the rhythm even.
DIY nailhead trim usually works best on:
- A simple upholstered headboard.
- A small bench edge.
- A plain ottoman.
- A sturdy dining chair back.
- A thrifted piece already headed for a refresh.
It is riskier on delicate antiques, very thin plywood, fragile fabric, rented furniture, or expensive pieces where mistakes are costly. If the piece is old or valuable, read our antique furniture guide before changing the original details.
Decide whether to repair, remove, or leave it alone
Loose or missing nailheads do not always mean the piece is ruined. Sometimes one tack can be reset. Sometimes a whole row is loose because the fabric or frame has weakened. The right fix depends on the furniture’s value, construction, and use.
Repair may make sense when the furniture is sturdy and the trim is part of the look. Removal may make sense when the nailheads are rusty, sharp, overly shiny, or visually dated. Leaving it alone may be best when the trim is original to an antique or vintage piece and the furniture is stable.
If you are already considering paint or a broader refresh, keep the details coordinated. Our furniture paint guide can help you decide when a small update is worth the prep and when the piece may need a quieter role instead.
Style the surrounding room more softly
Once nailhead furniture enters the room, the surrounding layers should give it breathing room. Use textiles, wood, and matte finishes to soften the metal rhythm.
Try these combinations:
- Nailhead dining chairs with a plain wood table.
- A trimmed bench beside a soft curtain and simple wall art.
- A nailhead headboard with relaxed bedding and no extra metal wall decor.
- A trimmed ottoman with a matte tray instead of shiny accessories.
- One accent chair with a quiet rug and low-contrast cushion.
Avoid stacking too many outlined objects nearby. If the chair has nailheads, the mirror does not also need a studded frame. If the headboard has a strong metal edge, keep bedside lamps simple. The room should feel layered, not decorated from the same detail outward.
A quick nailhead furniture checklist
Before you buy, repair, or add nailhead trim, ask:
- Is the trim defining one useful edge, or every possible edge?
- Does the nailhead size match the furniture scale?
- Is the metal finish calm with the room’s hardware?
- Is the upholstery simple enough to carry the detail?
- Are the heads smooth, secure, and evenly spaced?
- Will the trim touch skin, bedding, bags, or nearby furniture?
- Does the room need this extra rhythm?
Nailhead furniture can be lovely when the detail has a clear role. Keep the line clean, the finish muted, and the surrounding room soft. In a small home, that restraint is what lets the trim feel tailored instead of noisy.
You might also like
Wicker Furniture: Small-Room Material Guide
Choose wicker furniture for small rooms by comparing natural wicker, resin wicker, scale, cushions, care, and texture.
Replacement Cushions for Outdoor Furniture: Fit Guide
Measure replacement cushions for outdoor furniture by checking frame size, thickness, fabric, foam, ties, and storage.
Rattan Furniture: Choose Texture Without Clutter
Use rattan furniture in small rooms by choosing the right material, scale, weave, and care routine for a lighter, warmer space.